
SHOEMAKING ADVENTURES

Entry posted by Mushy the Mushroom in cinnamon toast?
586 views
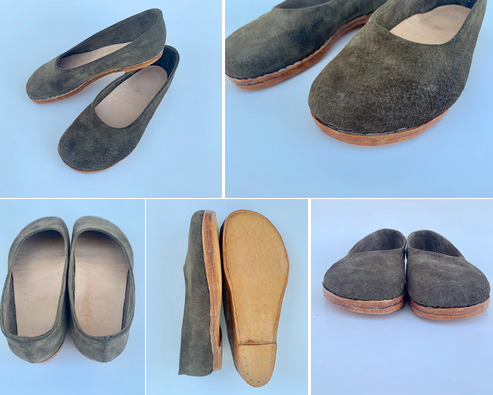
First try at leather shoes + shoemaking with my lasts. Started them about five months ago but didn’t have the time/supplies to complete them until last week. Ballet flats don’t normally use welted sole construction, but I wanted to try the technique. Used the narrow German welt method.

Made from a 20ish year old suede jacket (outer and lining), ¼” thick veg tan leather (insoles, outsoles, welt), faux leather (stiffener), ¼” wide leather reinforcement tape, ⅛ in thick cork (filler), bamboo shanks, Barbours 6 unwaxed cord (welting), coad/shoemaker’s wax/pitch, contact cement, neoprene glue, beeswax, shellac, and tiny wire nails.
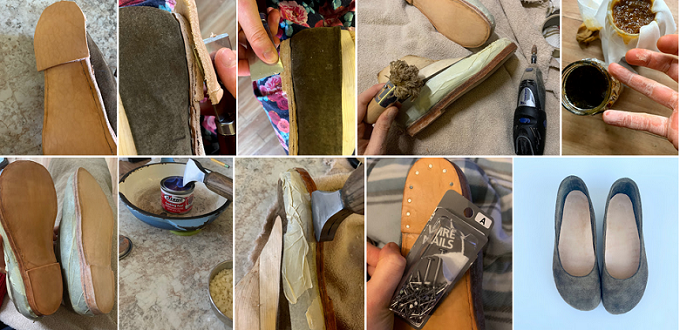
First, I completely covered the lasts in masking tape, drew the design on, cut and pulled the tape portions off and stuck them to paper. Then added seam allowances and tested a paper version. Then cut the uppers, sewed together and applied reinforcement tape at the seams. Then cut the veg tan insoles, marked and skived, and poked the awl through the feather/holdfast, marking the holes.(Attached with rubber bands- didn’t want to nail into the last until steel protector plates were added.)Next, dry lasted/stretched the leather with pincers, contact glued the lining layer around the feather/holdfast, glued in faux leather toe and heel stabilizers, smoothed out with the rasp, and lasted, glued and rasped the outer layer in place.Then made coad/shoemaker’s wax/pitch by melting pine rosin with beeswax, dropping the hot mixture into a water bucket and kneading it into little blobs (Recipe in sources). Made skived welts out of strips of veg tan. Waxed the thread with the coad/pitch/waxand started saddle stitching. Was initially painful and time consuming because of neglecting to wet the welt, and lack of a proper, sharpened awl needle. Ordered an 1840s curved awl needle which worked in a comparatively magical manner.
(Excessive progress photos feat. my parched, lotion-hating fingers. XD )
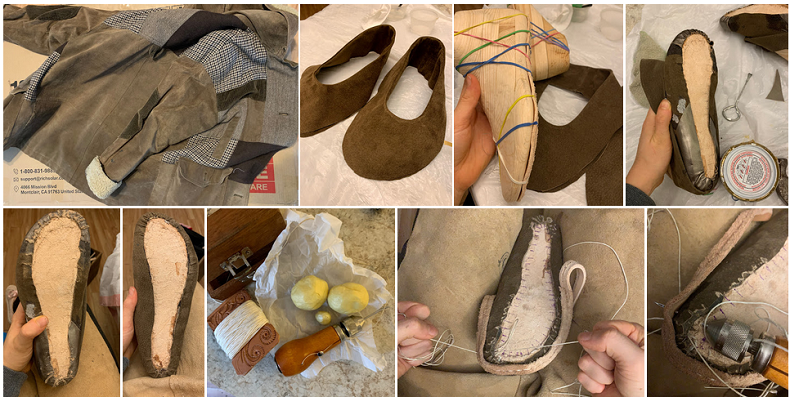
I couldn’t find any suitable shoemaker’s bristles or needles online, but read that some used guitar strings instead. So I thought I’d try to use these floss threaders, which surprisingly worked. Then skived the wet welt a bit to smooth the fuzzies out. Added the cut-down bamboo shanks +leather covers and contact glued in. Then took the ⅛” thick cork sheets and contact glued and rasped two layers on. Then contact glued and hammered the rough-cut veg tan sole on. Trimmed excess off with the skive knife, Dremel sanded, and smoothed with a glass shard (Sorry mayo jar, you were a lovely sacrifice).
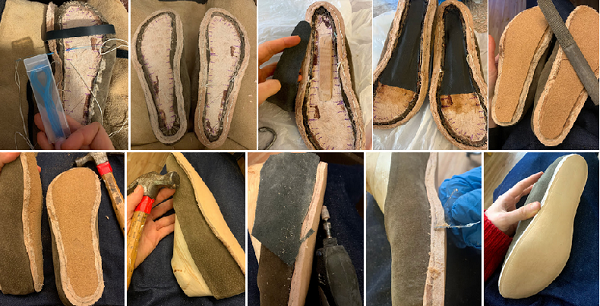
Marked and cut the angled slits for stitching and saddle stitched through. Then closed the slits with neoprene glue (AKA Shoe Goo. Same stuff, just cheaper.) and hammered.
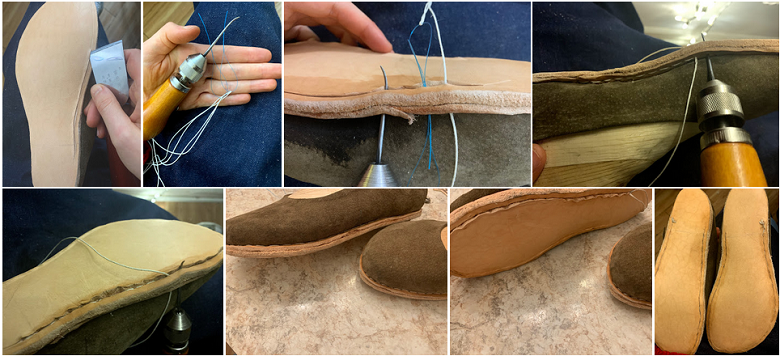
Neoprene glued the heel layers on, cutting the excess off of each individual layer and rasping down. Then wet sanded the sole edges with the Dremel. (That protective masking tape was a terrible mistake. Had to remove the sticky residue with a freezer, a brush, a pencil eraser and suede cleaner. #fail ._.) Then made shellac for the soles from dewaxed orange shellac flakes and denatured alcohol. Sticks to skin very well. Should’ve worn gloves. (Recipe in sources) Applied the shellac to the soles, two coats. Then rubbed melted beeswax to the sole edges. For lack of a better system, I used the Sterno inferno to heat the heel edge iron and melted the wax to seal. Lastly, added little nails in the heel for extra security (Probably used too many, got excited.)
Pretty rough, I have no idea what I’m doing, but I guess that failing = learning. Should hopefully be easier next time. I’m ecstatic about all the online tutorials for this stuff! *Tries to contain the INTENSE EXCITEMENT*
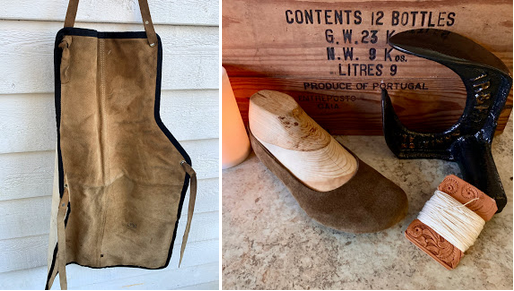
Also so thankful my dad’s around more, so I can hassle him about tools and garagestuff. XD He gave me this old leather welding apron to prevent unintentional stab wounds, and I’m fan-girling over it. He also refinished and painted the rusty Cobbler’s anvil from my grandmother’s barn, and made the "heel edge iron". I couldn't find the latter for sale in the US, showed him a photo, and he was able to make it from an old mallet head and the end of a walking stick. Best. Gift. Ever. ;_;
Here are source links in case anyone else desires to pursue a fading trade with wild abandonment. 
...And also so I can remember this stuff next time. 
https://www.youtube.com/watch?v=ITiyKmYnL-0&feature=youtu.be
https://www.youtube.com/watch?v=6LsE4nsEOJk&feature=youtu.be
https://www.youtube.com/watch?v=x2lCXlGp_GA&feature=youtu.be
https://www.youtube.com/watch?v=O7L6nPNNPBc
https://shoesandcraft.com/2011/01/13/german-welt-tutorial-2/
https://shoesandcraft.com/2011/01/21/a-little-more-about-german-welt/
http://carreducker.blogspot.com/2012/05/threads.html?m=1
https://medium.com/@mbliskavka/shoemaking-school-pt-3-making-thread-and-welting-25e157bc7f5a
https://www.ianatkinson.net/leather/leatherguide.htm
http://aands.org/raisedheels/Techniques/coad.php
https://www.shellac.net/shellac-mixing-application.html
https://shoesandcraft.com/2012/12/05/heel-edge-finishing/
Edited by Mushy the Mushroom
-
 1
1
-
 2
2
2 Comments
Recommended Comments